Thursday 2 May 2013

Confessions of an Ikea Junkie (who unfortunately does not get any kickbacks from Ikea for promoting their products)


2001 was an unforgettable year for me. That was the year that I moved to Israel
and the year that Ikea opened its first Israeli store. 


If you think about it, the implication of being a country with an Ikea reaches way beyond whether or not you can find an “Expedit” bookcase or a “Lack” table locally (though if it were
only that, dayenu, it would have been enough). It’s like moving from out of town
into the heart of the city. It’s as if the rest of the commercial world is saying,
“Welcome to the big leagues, Israel. You have arrived.” I know this sounds just a
teensy bit over the top but work with me here.

Contemplate what Ikea has done for our national pride. “Don’t buy that in America, you can get it cheaper in Israel,” said no one, ever! We stuff massive containers full of furniture and other junk that we probably don’t have space for anyway just because “who knows if we’ll be able to find it in Israel.” Well, not anymore! I wouldn’t even be surprised if the numbers of people making aliyah increased because of Ikea. It totally obliterates the “I can’t move to a country where nothing is familiar” excuse. Just go to Rishon or Netanya (store locations),
bring a good pair of ear plugs, and you’ll feel like you’re at Exit 13A on the New
Jersey Turnpike.

As an interior designer, I always appreciate having a resource for my clients
that is inexpensive, stylish, and, for the most part, decent quality. If you’re on a
budget, nothing tops the versatile functionality of Ikea’s furniture.

Here are a few iconic Ikea products that can serve so many different functions:

The Expedit Series: Ingeniously simple, Expedit is a shelving unit made of deep
cubby-like squares that come in a number of sizes: 2 by 2, 2 by 4, 4 by 4, 1 by 5,
and 5 by 5.

Many use the Expedit as a bookcase. (Incidentally, they are a perfect fit for vinal
records.... What’s a vinyl record?) The Expedit doesn’t have a back so, loaded
with coordinated baskets and nick nacks, the 5 by 5 unit makes a great room divider.
Put the 1 by 5 unit on its side, add some fabric and foam, and you have a
bench with storage. 
source: http://iheartorganizing.blogspot.co.il


Turn the 2 by 4 unit on its side, attach 4 feet or casters (also
from Ikea), and you’ve created a unique and attractive breakfront.
And, with a little imagination, the 2 by 2 can be a dollhouse.

source: http://www.101woonideeen.nl


Grundtal: A storage system based on mounted rails and “s” hooks, it’s often
used for hanging pots. Mount the same system in your entry way and hang book
bags and coats. Install the rail behind your sink to keep your cutting boards from
falling over or mount it inside the kitchen cabinet door and store your pot lids on
the door.
http://www.apartmenttherapy.com

Lamplig: A huge cutting board (46 x 53) that fits perfectly over your sink to
provide you the sometimes necessary added counter space.
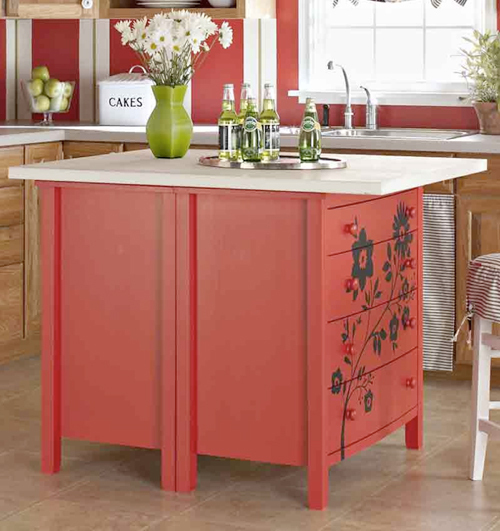
“An Ikea Hack”
There are entire websites solely devoted to “hacking” Ikea products. My favorite
is a kitchen island created from a 2x2 Expedit unit, coordinated baskets, a
Grundtal towel rack, casters, and a Lamplig cutting board turned “butchers block
countertop.”

source: http://www.ikeahackers.net


Simple designs. Endless possibilities. Now all we need is a Target.

Wednesday 10 April 2013

Post Pesach Painting Pointers


I wrote this article 3 weeks ago. It was originally intended as a pre-pesach painting tutorial. Then I started having pangs of conscience. Could I honestly attempt to inspire a Do-It-Yourself project at a time when any activity beyond chametz removal is out of place? On the other hand, I completely identify with the simple chametz search turned massive spring cleaning production. I totally get it. Some of us just can’t help ourselves. If I'm already going through the trouble of emptying the closet to look for chametz, is it such a big deal if I sort, pitch, and organize the contents as I put them back in? (In my mind, consciously dumping items back into a closet haphazardly feels almost as wrong as putting on dirty clothes after a shower!)  And if the closet is already empty, wouldn't it be just a crying shame to not move it away from the wall and paint?  Thankfully, that’s the point where I grabbed my Yetzer Hara by the paint brush and said  “No! You will NOT move that closet! Not only that but when you do paint, AFTER Pesach, you’ll paint around the closet (gasp!) because no one will see behind it anyway! Now, back to your search for Chametz!”


Thankfully, one can still spring clean (and paint) even after Pesach. Now that the Pesach dishes are packed away and chametz is once again abound, this is a great time for Do-It-Yourself projects. Here are some things to know before you head out to the hardware store:

First, understand that the hardware store is a black hole. It sucks you in. I don't think I've ever come out of that place with just what I'd originally intended to buy. And when I'm in a Do-It-Yourself fixity kind of a mood, it's worse than going food shopping when I'm starving. Go in knowing exactly what you want to do and precisely what supplies you need to get the job done quickly. (Though, now that you don’t have that “pre-pesach-pressure”, maybe you can afford a little holiday perusing the isles. Yes, I am a Do-It-Yourself junkie….I even built my own peregola….but I digress…)

That said, there are a few things to consider when choosing your materials:


Paint

Paint FinishAdvantagesDisadvantagesRecommended Usage
Matte (least shiny)hides imperfections, goes on smooth over rough surfaces  harder to keep clean                   Not the best choice for high traffic areas
eggshell (slight luster)             can be wiped with rag                                                 imperfections are more noticeable     good for use in bathrooms, kitchens, and other high traffic area
semi-gloss (very shiny)       stands up the best to water and scrubbing                           imperfections are very noticeable            Use this for trims and doors


Latex (water) or Oil?

Latex based paint cleans with water, doesn't give off a strong odor, and dries quickly. While oil based paint is quite odorous and takes a long time to dry, it provides a smooth service that resists scratches, finger prints, and stains.  For walls, latex us usually the paint of choice.

Low VOC
Make sure to choose paint that has a low VOC (volatile organic compound), High amounts can cause breathing problems and environmental issues

How much paint do you need?
Add the width of each wall and multiply it by the height of the ceiling. Divide that number by 15 (as there are approximately 15 meters of coverage per liter of paint). This equation doesn't take into account doors and windows so you should have a bit left over touch ups

Brushes
You want to use a synthetic-bristle brush when working with latex paint. Natural bristle brushes absorb the water from the paint making them difficult to work with. It is worthwile to invest in quality brushes, especially if you are an amatuer, because compared to inexpensive brushes, they apply paint in a thicker, smoother film providing for maximum and uniform coverage. You'll need a 2" angled brush, for cutting into corners, a 3" brush, and rollers.

Don't forget to add painter's tape, a putty knife, and a roller tray to your purchases.

Once you've freed yourself from the clutches of the hardware store, bring home all of your painting paraphernalia block off solid amount of time to complete the entire project, or at least one wall.
,
A good paint job starts with good prep work. Begin by removing or covering all of the furniture in the room. Do not skip this step! Assume that your paint will drip and will be difficult, if impossible, to clean when it dries.

Remove any nails, brackets, or picture hangers and fill holes or imperfections with spackle, allow to dry, and sand the patches (lightly). Note: if you have a crack, you need to widen it a bit before spackling because otherwise, the spackle will just sit on top. Scrape away any peeling paint and sand that area as well.

Painting directly over spackle or joint compound will likely result in an irregular surface or dull spots, known as “flashing”. This can be remedied by priming the walls after spackling.

Primer, otherwise known as "base coat",  is the first coat of paint (or paint product) that is applied to the surface. Priming guarantees that any ensuing layers of paint adequately adhere to the surface. I know what you’re thinking – a n o t h e r coat?!! The good news is you can have the primer tinted the color of your paint and this can save you a coat of painting later on.

You don’t need to use a primer if your wall doesn’t require any spackling or you’re painting a previously painted room, where the original paint is in good condition (and close to the new color). paint will stick well to paint, as long as the original paint is in good condition.

Use a damp cloth to wipe walls and allow them to dry.

Apply painter’s tape to the ceilings, trim, outlets, and baseboards. This is not a good opportunity to get rid of left over masking tape that you just happen to have at home. Painter’s tape is specially made to leave no residue and will come off the wall easily even after the paint has dried.

Wet your brush or roller before painting – this makes it easier for the brush to pick up and release paint.

Holding the brush the narrow way (not the way you would naturally hold it) makes it easier to get a crisp line when painting trim. Hold the brush near the base of the handle and dip the brissles a third of the way into the paint. Tap (don’t wipe!) the excess paint off the brush.

When you’re painting with a roller, you can’t get right up to the edges were the walls meet  the ceiling or the walls intersect with each other.  Filling in this area with a paintbrush  is called “Cutting in.”
Paint with enough pressure to bend the bristles slightly. Baring down too hard will leave brush marks.

When you’ve finished cutting in, load  the roller.  and paint onto the wall in an overlapping “W”. Fill in the W without lifting the roller to ensure even coverage.  Work in 3-4 foot sections beginning  at the ceiling and working your way down to the floor.

The sequence should be: Cut in one wall, fill in with the roller, cut in the next wall, fill in with the roller, etc. You shouldn’t cut in the entire room at once because the paint will begin to dry around the edges before you reach your final wall.  This will make your room look like it has a frame.

Latex wall paints take 1 hr. to dry to touch, 4 hours to re-coat, and up to two weeks to fully cure (i.e. if you want to wash the walls, or place something against it or on it if shelving). In other words, Yom Tov would have necessitated putting the furniture back right away which would have compromised all of your hard work. So congratulations to you on deciding to wait! (And thank you to my husband who insisted that I wait - hid my paint brushes- for without him, we would have had pretty walls and very very stressful erev bediat chametz….)

Wednesday 27 February 2013

How Yellow Makes You Blue (and other color conundrums)

My first daughter was born after three boys. She is our resident princess whose every girlie desire is fulfilled to the T. To be clear, I'm in love with my boys. We have a blast being wild and crazy together and I've even taught them how to make potato kugel. But, in my mind, a frilly pink onesie with a matching organza hair clip trumps a blue onesie on any day.


Of course, that's just my humble opinion - and apparently, now that la princessa has turned four, my fashion opinion is irrelevant. 

Our morning standardly looks like this: I take out a gorgeous floral jumper with coordinating shirt and tights which she promptly rejects in favor of her brown turtle-neck, navy skirt, and pink,grey,and white striped tights. Mortified, I  personally bring her to gan making sure to engage the ganenet in conversation and "casually" mention that her ensemble was princess' choice and most certainly not mine. 
She'll never be a fashionista and her future as an interior designer looks bleak but there is an element to her stubbornness (I mean, steadfastness) that I really enjoy. This is a kid who knows which color palette makes her happy.

The whole topic of color stands at the very center of good interior design.


When you approach interior design, you likely do so in a couple of different ways - choosing objects and colors that simply look attractive or using an existing pattern or theme to dictate your decisions. Both are fine (and safe) ways to infuse color into your home. However, color is a powerful tool that can be used to inspire emotions or simply set the mood and atmosphere for any particular room. 

Of course, your feelings about color can also be deeply personal and are often rooted in your own experience or culture. Still, research does show that we all share some basic responses to color. 

There are commonly noted psychological effects of color as it relates to two main categories: warm and cool. 
The reds, oranges, and yellows of the color wheel are referred to as the warm colors. These colors create more adrenaline which causes your blood pressure to rise. This increases your heart rate which increases your body temperature. Of course, the more saturated the color, the greater the effect. Warm colors can spark a variety of emotions ranging from comfort and warmth to hostility and anger.

On the other side of the color wheel, greens and blues- are referred to as the cool colors. They are said to make us feel cool by slowing our heartbeat, relaxing our muscles, and lowering our body temperature. Cool colors often spark feelings of calmness and tranquillity. 

Here is a short list of commonly observed associations with specific colors. Notice if any of these associations ring true for you as well:

Red: love, warmth, excitement, and passion. Red is a color that increases enthusiasm and motivates to action.

Light Blue: health, tranquillity, calmness  

Dark Blue: stability, trust, integrity, and power.

Green: rest, relaxation, nature, growth, freshness. Green is soothing and restful on the eye.

Purple: tranquillity, opulence, and wisdom. Because it appears so rarely in nature, purple can sometimes feel artificial or exotic.

Yellow: Cheerfulness and sunshine. However, in its most saturated form, yellow is most likely to cause eye strain and is prone to make babies cry. 

Brown: wholesomeness and practicality, orderliness, grounded with a connection to Earth. 

Color is a massive topic which goes way beyond the scope of one post. Next time we'll see how color is used in interior design to effect desired responses - not that color psychology is a tool used by interior designers alone.  Color psychology plays a prominent role in marketing and branding specifically. Yep, We're all playing with your mind. 

Monday 11 February 2013

Who "Wood"a Known?


I think that living in Israel is fantastic for my middot (character). Every time I start to feel self centred, I peer out my window at the 10 year old boy helping an old lady with her groceries. When I need a push to simplify, I take a walk through the alleyways of Beis Yisrael, where real people still live contently in miniature apartments built sometime in the late 1800's. 

And, when I need a dose of humility, I need only to open my mouth and attempt to articulate myself to the nice-ish lady from the gas company who's becoming increasingly less nice by the minute as I try, for the third time, to explain that there is a flood in my boys' room because of a gaping hole that their technician left in my exterior wall. "Yesh mabul biglal chor" I say, "biglal hatechnai". "Nu?" Gas Lady responds. I'm so tempted to tell her that I really am intelligent in English but, thankfully, my wounded pride won't allow me to stoop that low. 

But not all customer experiences in Israel were created equal and while humility certainly has it's place, the job of a consumer is to be his or her own advocate. We, as Anglos, can even the playing field in our favor by arming ourselves with information and a critical eye. 

A very relevant example is cabinets - bedroom, kitchen, and bathroom.
You are about to shell out a sizable sum and you want to make sure that you get the most for your investment.

You can go into the store knowing that you "want something quality" and perhaps your neighbor even warned you to only buy "sandvich" OR you can walk in knowing the following:

Typically, the material used for construction of a cabinet carcase (body) in Israel is "sandvich" (known in the alter heim as "plywood") or "Sibit" (particle board).
Sandvich is an engineered wood product that is made of a sandwich (hence the name) of thin layers of wood. Each layer is laid with the grain running at 90 degrees to the layer below. The result is a strong and dimensionally stable material.
Particle board is a composite sheet material made by combining wood particles with glue and then heated and pressed into sheets.
Plywood

Particle Board


Plywood is generally the preferred choice because it is more resistant to moisture (note: I did not say waterproof.) and it holds fasteners (nails, screws) better than particle board.

That said, within each category there is an entire range of qualities. Saying that a cabinet is made of sandvich gives as much information as saying that your sheets are made of cotton. Thread count? Fiber? Weave? Finish?

This is where many consumers are fooled. They hear "sandvich adom" and they're sold. Nowadays, almost all wood sheets are manufactured and imported from china so that the "sandvich" of today can't compare to the sandvich of 10 years ago. 

You need to know if your wood is approved by the Israel standards authority (machon hatkanim) and if it's been sufficiently protected during transportation. 

In addition, you can ask the carpenter to see a sample of his wood. A quality sheet of sandvich usually has at least 9 layers of ply. Also, if you see gaps and imperfections on the edge, you know that the wood is of lesser quality (though still usable). 

The quality of sibbit is defined by the density of the particle chips and the quality of the glue. 

As an aside, Sandvich is a good choice for a static application like the cabinet body but not for a door or drawer front which is constantly in motion. Doors are typically made of MDF (Medium Density Fiberboard) and covered with laminate (formica) or veneer (forneer).  

The most important information that you can get from any manufacturer or carpenter is 2 or 3 names of previous customers. Reputation and recommendations are critical. Do your due dilligence, make an informed choice, and then enjoy your new furniture!

Sunday 27 January 2013

Custom-made or Up-grade. How to make your kitchen work for you.


I have to confess. I had no idea how to cook when I got married. My repertoire consisted of tuna salad and the peanut butter and jelly sandwich. Iconic dishes, true, but only sufficient to satisfy one's palette for SO long. Preparing an entire shabbos felt like an insurmountable task. We moved into our apartment in Israel in the middle of Cheshvan and,lucky for me, our oven was completely treif so we had to wait for someone to blowtorch it.  That followed with a few weeks of (self imposed) family obligations. We had been living in Israel almost six weeks when my husband tentatively suggested that we stay home for shabbos. There were no more excuses. The time had come to face my fears. So there I stood, all alone, in my 4 meter kitchen with its bare fluorescent bulb and tiny cracked counter top attempting to decipher Chinese like "parboil" and "caramelize" and "dredge". Let's just say, I'm thankful that I made it through that first experience without too many scars. 
As a person who loves challenges and new experiences, I often wonder what scared me so much about conquering the cooking monster. My designer self likes to believe that the problem wasn't me but, rather, the uninviting disaster of a space that kept me away. 
I'm not saying that a well designed kitchen will magically transform you into a master chef, but simply that a functional and attractive space will encourage you to spend more time there. 

If you are one of those lucky people who is about to "do a kitchen", I humbly offer one piece of advice - hire a designer. That wasn't a plug, seriously. Hire anyone. Kitchen design is complex. Issues included are functional, technical, personal, aesthetic, spatial, logistical, financial, to name a few. It allows you to get the details sorted out on paper, before things are built incorrectly and then have to be altered or torn out or, worse, left as is.

If you are in a rental or you haven't budgeted for a custom kitchen, there are ways to upgrade your standard kitchen to create a functional and inviting experience. 
  • Give the kitchen a restaurant feel by removing the doors of the cupboards and upper cabinets to expose the shelves. This is a quick and easy way to totally change and expand the look of the kitchen but requires a commitment to stay clutter-free. Do this for cabinets that store china, stemware, and service pieces as apposed to food. Store small items in wicker baskets. 
  • Replace just the cabinet doors. A door made of MDF (Medium Density Fiberboard), covered in Formica (including quality hinges), can cost as little as 100nis per door.
  • Replace just the counters. There are quality attractive counters that cost as low as 800nis per meter.
  • Add Moldings: If your old cabinets don't go to the ceiling, adding a crown molding or soffit around the top will make a room look more elegant.
  • Upgrade Interiors. Slide-out shelves, lazy Susans, drawer dividers, and full-extension drawer glides can be retrofitted to your old cabinet interiors.
  • Add an Island. It can be anything- back to back dressers with a butcher's block or a re purposed file cabinet. Your decor doesn't have to be match-matchy, it just has to go.

via Apartment Therapy
                     
And, if you've done a custom kitchen and you love it, I'm coming for dinner!

Thursday 17 January 2013

It's All About You!

We recently finished a major renovation to our apartment. We took a 3 room apartment on the top floor of a building and added a 2nd story on the roof. We put the salon and kitchen on the 2nd story and turned the original apartment (2 bedrooms, a salon, and kitchen) into four and a half bedrooms. Its interesting and different and totally consistent with my personality so that I always get a good feeling when I walk in the door.

That is what good interior design is all about. There are principles and rules that help create balance but it is more important that the design and decor in your home reflects your personality and living style rather than any conventional rule. And, you certainly don't have to completely gut your home and start from scratch in order to inject a bit of "YOU" into your space.  

Here are a few stylish ways to personalise your space without knocking down any walls. 

Accessorise


Accessories are a great way to bring your decor together. It's also another way to add a personal touch to your space as they often tell a story of where you have been or where you interests lie. Even if you choose neutral colors for your walls and furniture, you can still create a colorful atmosphere with the accessories you choose. 

Family Art
Take your favorite family photos, blow them up in different sizes, and hang them in similar (or different) picture frames.  Collect old photographs from your parents and grandparents to create a heritage display, or include your own baby photos with the baby photos of your children. ( Incidentally, you may encounter some objections from your bigger children who don't appreciate pictures of their 2 year old selves wrapped in a towel. Every time I hang that picture, it miraculously "disappears" the same day!)

Stick To It

Wall stickers are unique wall art without the large price tag- and they can be changed as often as you like. There are many places (including, you guessed it, Ikea!) that sell a variety of designs from animals to flowers to phrases. The look is a bit modern so if you are traditional in your tastes, this may not be your living room decor of choice, but there are whimsical wall stickers that make a fantastic addition to children's bedrooms. 

Support local artists
And I mean very local! They may not be Picasso's in the making but nothing is more special and personal than your child's artwork. Instead of posting these masterpieces on the fridge, display those brilliant creations more formally. For a unified look, hand each of your kids the same color crayons or markers and ask them to draw something specific. You will most certainly end up with variations on a theme. 

"Texstyles"
With the business of moving and unpacking behind me, I finally had the time to turn the "room where my girls sleep" into a "girl's room". With the addition of matching duvets and coordinating rug and curtains, the room went from "meh" to "marvellous". I invested less than 500nis and, of course, everything can be easily updated and replaced whenever I choose. 
The Girl's Room

The Boy's Room (formerly the kitchen!)

        How have you personalized your space? 

Tuesday 1 January 2013

The Rundown Rental- Reasonable Redecoration Recommendations


We moved to Israel on a whim. Well, not a whim, exactly. It was more like a four year aliyah plan that turned, over night, into four weeks. We set off with no kollel (for him), no job prospects (for me), and nowhere to live (for either of us). A wonderful family member offered us her vacant machsan apartment for exactly 2 weeks, until the new tenants were to arrive.

I set out sprightly each morning, armed with my Yisa Bracha listings, and returned each evening with a heavy heart, quickly becoming aware of the alarming reality - there were no apartments in Ramat Eshkol to be had. 

Two weeks became one, seven days became 3, and in the ninth hour (or dare I say the hundredth?), The One Who Can Do Anything, did. 

With boundless joy, we gathered all of our worldly possessions and moved into our tiny, grungy, old, run down, tastelessly decorated, rental.  I don't think there existed a happier couple in all of Ramat Eshkol. 

Thankful, unquestionably, but also a little overwhelmed by the task of turning this less-than-attractive space (I'm being very generous) into a happy, comfortable, livable home. 

Here are a few ideas that I wish I'd known back then:

  • Camouflage unattractive flooring by adding an extra large area rug and bright accents.
  • Think ahead. Use modular furniture, Ivar shelves from IKEA or Cubitec by Doron Lachish, so that you can accommodate a different space when you move to your next home.
  • Your rental apartment may come with some unique colors choices (the back splash in our kitchen was fire-engine red.) Don't fight it! Create a pulled together look by incorporating the color in accents like dish towels, artwork, or a piece of furniture.
  • Good lighting can completely transform a room and it's source doesn't have to be a hardwired ceiling fixture. Use plug-in floor lamps, scones, or under-cabinet lighting in the kitchen to brighten up a room and open up dark corners.
  • You can make bookshelves seem built-in by flanking them on either side of a room entrance or window. You can even add moldings or trimmings to increase the affect. 
  • Invest in inexpensive renovations. Even if the apartment isn't yours, you'll probably live there long enough to benefit from improvements that minimal renovations can offer.
                 -A coat of paint can instantly change the mood of a room.
                 -Change your hardware. Many apartments have plain cabinet pulls that are old                             and boring. You don't have to live with them. Replace them with  something personal and interesting. You can always reinstall the old ones before you leave (and bring yours with you).
                 -Light fixtures can easily be switched and are a quick way to personalize a space. 

  • Furniture in a rental is often a hodgepodge of pieces that you or your landlord picked up. It doesn't always look nice and it doesn't always match. Unify the  motley bunch with slipcovers for your chairs and couches.
There is no official formula for making a rental apartment attractive and more fun to be in. Take a critical look at your space, identify your needs, and shake it up. Don't hesitate to make changes like moving furniture around or replacing blinds. A little effort and creativity can make a meaningful difference. 
(And if you aren't exahusted once you've completed your redecorating efforts, just say the title of this post 5 times fast.)